欢迎访问Spring Cloud中国社区
《重新定义Spring Cloud实战》由Spring Cloud中国社区倾力打造,基于Spring Cloud的Finchley.RELEASE版本,本书内容宽度足够广、深度足够深,而且立足于生产实践,直接从生产实践出发,包含大量生产实践的配置。欢迎加微信Software_King进群答疑,国内谁在使用Spring Cloud?欢迎登记
使用Spring Boot 2.0, Eureka和Spring Cloud快速搭建Spring微服务
译者注:
- 本文译自https://piotrminkowski.wordpress.com/2018/04/26/quick-guide-to-microservices-with-spring-boot-2-0-eureka-and-spring-cloud/。 笔者使用翻译的方式, 咬文嚼字地理解原文, 把翻译的结果也贴出来, 请大家指正。
- 本文内容13942个字, 阅读完大概需要30分钟。
- 本文内容假定读者已经对maven和Spring有一定的使用经验。
我博客中, 有不少文章是关于Spring Boot和Spring Cloud的。现在这篇文章,主要是想总览地介绍地下Spring Boot和Spring Cloud框架提供的核心组件, 期间使用了一个实际可运行的例子来帮助我们更直观的理解怎么使用Spring创建微服务。 本文包含如下话题:
- cloud-native开发环境中使用Spring Boot2.0。
- 使用Spring Cloud Netflix Eureka, 完成微服务的发现功能。
- 使用Spring Cloud Config服务提供分页式配置服务。
- 使用Spring Cloud Sleuth整合日志
开始撕代码之前, 咱们先看看下面的图。这个图展示了我们实例的整体构架。这里,有三个独立的微服务,它们在服务发现模块里注册,从配置服务里取配置信息,并在业务上相互通信。整个业务系统隐藏在API Gateway的后面。
目前, 最新版本的Spring Cloud是Finchley.M9。 这里, 为了管理依赖的方便, 直接使用spring-cloud-dependencies, 具体Maven配置如下:
<?xml version="1.0" encoding="UTF-8"?>
<dependencyManagement>
   <dependencies>
      <dependency>
         <groupId>org.springframework.cloud</groupId>
         <artifactId>spring-cloud-dependencies</artifactId>
         <version>Finchley.M9</version>
         <type>pom</type>
         <scope>import</scope>
      </dependency>
   </dependencies>
</dependencyManagement>
现在,我们将一步步地使用Spring Cloud创建一个基于微服务的应用系统。接下来, 将从Configuration Server开始。
本文中的例子代码可以在GitHub repository下载。
步骤1. 使用Spring Cloud Config构建配置服务
为了让系统启用Spring Cloud Config功能, 首先需要引入spring-cloud-config-server, 其Maven配置如下:
<?xml version="1.0" encoding="UTF-8"?>
<dependency>
   <groupId>org.springframework.cloud</groupId>
   <artifactId>spring-cloud-config-server</artifactId>
</dependency>
接下来,使用@EnableConfigServer注解来让系统在启动时,
@SpringBootApplication
@EnableConfigServer
public class ConfigApplication {
 public static void main(String[] args) {
  new SpringApplicationBuilder(ConfigApplication.class).run(args);
 }
}
默认情况下, Spring Cloud Config Server使用Git来保存业务系统的配置信息。这个默认设置在生产模式下, 相当不错。 不过, 在本文为了演示方便,我们将使用基于文件系统的配置存储方式, 这就足够了。 考虑到我们可以方便地把所有的配置信息放到classpath下, 很容易启动一个Config服务。 Spring Cloud Config默认会检索这样的路径classpath:/, classpath:/config, file:./, file:./config, 以加载配置项。
本文的实例里, 我们把配置信息放到src/main/resources/config目录下, YAML文件的名字也跟服务的名字保持一致。 本文实例中,为服务发现准备的YAML文件在这个路径下可以找到: src/main/resources/config/discovery-service.yml
关于Config服务, 最后两个重要的点儿。如果最终想使用基于文件系统的配置存储机制时, 我们需要把Spring Boot的profile设置成native. 这个可以在启动Spring Boot时设置参数–spring.profiles.active=native。另外, 配置的默认端口号从8888调整成了8061, 具体见bootstrap.yml文件中的server.port设置。
步骤2:使用Spring Cloud Netflix Eureka搭建服务发现
现在从配置服务转到服务发现,和后面别的服务一样, 服务发现配置里需要添加依赖spring-cloud-starter-config, 这样可以使用前面设置好的配置服务。 我们也需要添加spring-cloud-starter-netflix-eureka-server依赖。
<?xml version="1.0" encoding="UTF-8"?>
<dependency>
   <groupId>org.springframework.cloud</groupId>
   <artifactId>spring-cloud-starter-netflix-eureka-server</artifactId>
</dependency>
接下来, 在服务发现的Main类中添加@EnableConfigServer注解,这样可以告诉系统在启动时, 运行这个内置的服务发现功能。
@SpringBootApplication
@EnableEurekaServer
public class DiscoveryApplication {
 public static void main(String[] args) {
  new SpringApplicationBuilder(DiscoveryApplication.class).run(args);
 }
}
服务发现会从配置服务里获取配置信息。需要的最小配置项是系统的名字和配置服务的连接信息, 如下所示:
spring:
  application:
    name: discovery-service
  cloud:
    config:
      uri: http://localhost:8088
如前所示, 配置文件discovery-service.yml已经放到config-service模块中。 不过,针对如下所示的配置项, 有必要再说下。 这里我们调整了Eureka的默认端口号, 即从8761调整成8061. 针对一个独立运行的Eureka实例, 我们也需要关掉注册和注册获取功能。
server:
  port: 8061
eureka:
  instance:
    hostname: localhost
  client:
    registerWithEureka: false
    fetchRegistry: false
    serviceUrl:
      defaultZone: http://${eureka.instance.hostname}:${server.port}/eureka/
现在, 使用内置模式启动Eureka 后, 我们看到下面的日志内容:
顺利启动系统后,我们可以通过http://localhost:8061/ 访问Eureka的面板.
步骤3:使用Spring Boot and Spring Cloud构建微服务
我们的微服务在启动时, 将执行下面的这些操作:从配置服务获取配置项,在服务发现中注册,暴露HTTP API,自动生成API文档。 为了启动这些功能, 需要在pom.xml配置文件中, 包括下面的依赖。这里, spring-cloud-starter-config负责配置项读取,spring-cloud-starter-netflix-eureka-client和@EnableDiscoveryClient负责服务发现.springfox-swagger2和@EnableSwagger2负责自动生成API文档。
下面是本文实例中需要的所有依赖。
<dependency>
 <groupId>org.springframework.cloud</groupId>
  <artifactId>spring-cloud-starter-netflix-eureka-client</artifactId>
</dependency>
<dependency>
  <groupId>org.springframework.cloud</groupId>
  <artifactId>spring-cloud-starter-config</artifactId>
</dependency>
<dependency>
        <groupId>org.springframework.boot</groupId>
  <artifactId>spring-boot-starter-web</artifactId>
</dependency>
<dependency>
  <groupId>io.springfox</groupId>
      <artifactId>springfox-swagger2</artifactId>
  <version>2.8.0</version>
</dependency>
下面在Main类上, 添加EnableDiscoveryClient和EnableSwagger2两个注解。
@SpringBootApplication
@EnableDiscoveryClient
@EnableSwagger2
public class EmployeeApplication {
 public static void main(String[] args) {
  SpringApplication.run(EmployeeApplication.class, args);
 }
 @Bean
 public Docket swaggerApi() {
  return new Docket(DocumentationType.SWAGGER_2)
   .select()
   .apis(RequestHandlerSelectors.basePackage("pl.piomin.services.employee.controller"))
   .paths(PathSelectors.any())
   .build()
   .apiInfo(new ApiInfoBuilder().version("1.0").title("Employee API").description("Documentation Employee API v1.0").build());
 }
 ...
}
本应用将从远程的服务上读取配置信息, 这个功能需要一个配置文件bootstrap.yml来声明系统的名字和服务的URL。 从实例角度看,这也是一个配置服务优先启动策略的体现,这里应用首先连接配置服务,并从远程的配置信息中获取服务发现模块的地址。 这也是服务优先启动策略的体现,其中配置服务的地址信息从服务发现模块里获取。
spring:
  application:
    name: employee-service
  cloud:
    config:
      uri: http://localhost:8088
这里配置项不多。下面是远程配置服务上保存的配置内容。只保存的HTTP端口号和Eureka URL。 不过, 在远程的配置服务里, 也放置了另一个配置文件employee-service-instance2.yml。 使用这个配置文件, 设置不一样的HTTP端口号,这样可以方便在本地运行两个实例。我们可以在应用启动时,添加参数spring.profiles.active=instance2,在在端口9090上启动第三个实例。 使用默认项, 我们将只启动8090上的微服务实例。
server:
  port: 9090
eureka:
  client:
    serviceUrl:
      defaultZone: http://localhost:8061/eureka/
下面是使用RestController实现的具体业务逻辑,具体来说,有添加新员工和通过多种过滤实现的员工帅选功能。
@RestController
public class EmployeeController {
 private static final Logger LOGGER = LoggerFactory.getLogger(EmployeeController.class);
 @Autowired
 EmployeeRepository repository;
 @PostMapping
 public Employee add(@RequestBody Employee employee) {
  LOGGER.info("Employee add: {}", employee);
  return repository.add(employee);
 }
 @GetMapping("/{id}")
 public Employee findById(@PathVariable("id") Long id) {
  LOGGER.info("Employee find: id={}", id);
  return repository.findById(id);
 }
 @GetMapping
 public List findAll() {
  LOGGER.info("Employee find");
  return repository.findAll();
 }
 @GetMapping("/department/{departmentId}")
 public List findByDepartment(@PathVariable("departmentId") Long departmentId) {
  LOGGER.info("Employee find: departmentId={}", departmentId);
  return repository.findByDepartment(departmentId);
 }
 @GetMapping("/organization/{organizationId}")
 public List findByOrganization(@PathVariable("organizationId") Long organizationId) {
  LOGGER.info("Employee find: organizationId={}", organizationId);
  return repository.findByOrganization(organizationId);
 }
}
步骤4: 使用Spring Cloud Open Feign,实现微服务之间的调用
步骤3后, 我们第一个微服务创建和启动了。 现在我们再引入另两个微服务, 这两个新的微服务之间互相调用。 下图展示了本文实例中三个微服务之间的调用关系:organization-service, department-service和employee-service。organization-service微服务有三个方法, 先两个都依赖department-service , 第一个( GET /organization/{organizationId}/with-employees)会返回指定组织下部门和员工信息, 第二个( GET /organization/{organizationId})只返回部门而没有员工信息, 第三个直接调用employee-service返回指定组织下的员工信息,而不需要按部门分组。 微服务department-service返回指定部门下的员工列表。
上面场景中, organization-service和department-service 都需要定位到其它微服务并与之通信。 这也是为什么我们需要引入新的依赖:spring-cloud-starter-openfeign。 Spring Cloud Open Feign是一个声明式的REST客户端, 它使用Ribbon的客户端负载均衡机制来与其它的微服务通信。 下面是spring-cloud-starter-openfeign的Maven依赖配置。
<dependency>
 <groupId>org.springframework.cloud</groupId>
  <artifactId>spring-cloud-starter-openfeign</artifactId>
</dependency>
Open Feign的一个替代实现是使用Spring的RestTemplate和@LoadBalanced注解。
不过, Feign提供一个更为优雅的方式来定义客户端,
这里我们优先使用Feign。在Pom文件中添加了依赖后,
下面在代码中使用@EnableFeignClients注解来启用Feign。
@SpringBootApplication
@EnableDiscoveryClient
@EnableFeignClients
@EnableSwagger2
public class OrganizationApplication {
 public static void main(String[] args) {
  SpringApplication.run(OrganizationApplication.class, args);
 }
 ...
}
下面我们来定义客户端接口。 由于organization-service需要跟另两个微服务都有通信, 这里我们需要创建两个接口。 每一个客户端接口都需要使用注解@FeignClient, 这里需要标明name, 这个name需要跟服务发现中注册的名字保持一致。 下面是调用employee-service微服务的endpoint GET /organization/{organizationId}, 对应的接口定义:
@FeignClient(name = "employee-service")
public interface EmployeeClient {
 @GetMapping("/organization/{organizationId}")
 List findByOrganization(@PathVariable("organizationId") Long organizationId);
}
微服务organization-service里需要定义的第二个客户端接口要调用department-service的两个endpoint。 第一个是GET /organization/{organizationId}, 它返回指定组织下的部门列表,第二个是GET /organization/{organizationId}/with-employees, 在第一个接口返回数据的基础上再包含每个部门下的员工。
@FeignClient(name = "department-service")
public interface DepartmentClient {
 @GetMapping("/organization/{organizationId}")
 public List findByOrganization(@PathVariable("organizationId") Long organizationId);
 @GetMapping("/organization/{organizationId}/with-employees")
 public List findByOrganizationWithEmployees(@PathVariable("organizationId") Long organizationId);
}
最后, 我们需要把Feign的客户端Bean注入把REST controller中。 现在我们可以调用DepartmentClient和EmployeeClient定义的方法了, 他们跟调用REST endpoint效果一样。
@RestController
public class OrganizationController {
 private static final Logger LOGGER = LoggerFactory.getLogger(OrganizationController.class);
 @Autowired
 OrganizationRepository repository;
 @Autowired
 DepartmentClient departmentClient;
 @Autowired
 EmployeeClient employeeClient;
 ...
 @GetMapping("/{id}")
 public Organization findById(@PathVariable("id") Long id) {
  LOGGER.info("Organization find: id={}", id);
  return repository.findById(id);
 }
 @GetMapping("/{id}/with-departments")
 public Organization findByIdWithDepartments(@PathVariable("id") Long id) {
  LOGGER.info("Organization find: id={}", id);
  Organization organization = repository.findById(id);
  organization.setDepartments(departmentClient.findByOrganization(organization.getId()));
  return organization;
 }
 @GetMapping("/{id}/with-departments-and-employees")
 public Organization findByIdWithDepartmentsAndEmployees(@PathVariable("id") Long id) {
  LOGGER.info("Organization find: id={}", id);
  Organization organization = repository.findById(id);
  organization.setDepartments(departmentClient.findByOrganizationWithEmployees(organization.getId()));
  return organization;
 }
 @GetMapping("/{id}/with-employees")
 public Organization findByIdWithEmployees(@PathVariable("id") Long id) {
  LOGGER.info("Organization find: id={}", id);
  Organization organization = repository.findById(id);
  organization.setEmployees(employeeClient.findByOrganization(organization.getId()));
  return organization;
 }
}
步骤5. 使用Spring Cloud Gateway构建API Gateway
在Spring Cloud众多项目中, Spring Cloud Gateway是比较新的一个。 它基于这些底层构建的: Spring框架 5.0版本、Reactor和Spring Boot2.0.运行时, 也需要Spring Boot提供的Netty和Spring Webflux。相对于以前Spring社区里已有的Spring Cloud Netflix Zuul, Spring Cloud Gateway使用起来很方便。
API gateway是在gateway-service模块中实现的。 首先, Pom文件中, 需要引入spring-cloud-starter-gateway依赖, 内容如下:
<dependency>
     <groupId>org.springframework.cloud</groupId>
  <artifactId>spring-cloud-starter-gateway</artifactId>
</dependency>
接下来, 我们需要启用服务发现功能, 这是因为gateway-service需要整合Eureka来实现请求路由到下游的服务上。 gateway也对外提供了API文档, 这也是我们在gateway上启用Swagger2的原因。
@SpringBootApplication
@EnableDiscoveryClient
@EnableSwagger2
public class GatewayApplication {
 public static void main(String[] args) {
  SpringApplication.run(GatewayApplication.class, args);
 }
}
使用Spring Cloud Gateway时, 我们可配置三个组件来定制: route, predicate和filter。 route是gateway的基本构造单元, 它内部含有目标URI和一组predicate和filter。 predicate负责针对HTTP请求中任意元素(如header和parameter )进行匹配。使用filter, 我们在请求给到下游服务之前或调用完成后修改request或response里的内容。 所有的这些都可以通过配置项设置, 我们也在配置服务里加了配置文件gateway-service.yml, 这里集中定义了需要的配置项。
这里, 我们首先需要开启服务发现功能, 这个通过调协配置项spring.cloud.gateway.discovery.locator.enabled为true完成。 接下来, 我们定义路由规则。 我们使用基于路径的路由Predicate工厂来匹配进来的请求, 使用RewritePath Filter工厂来修改请求路径,以便跟下游提供的路径格式对齐。 URI参数指定服务发现中已经注册的目标服务的名字。 接下来我们过下这些路由定义。 例如, 为了使organization-service可以路径/organization/访问, 我们使用Path=/organization/这样的predicate定义方式, 接下来从路径中去掉前缀/organization, 因为目标服务的organization-service是通过路径/**提供的。 目标服务的地址是从URI为lb://organization-service的Eureka里获取的。
spring:
  cloud:
    gateway:
      discovery:
        locator:
          enabled: true
      routes:
      - id: employee-service
        uri: lb://employee-service
        predicates:
        - Path=/employee/**
        filters:
        - RewritePath=/employee/(?.*), /$\{path}
      - id: department-service
        uri: lb://department-service
        predicates:
        - Path=/department/**
        filters:
        - RewritePath=/department/(?.*), /$\{path}
      - id: organization-service
        uri: lb://organization-service
        predicates:
        - Path=/organization/**
        filters:
        - RewritePath=/organization/(?.*), /$\{path}
步骤6. 使用Swagger2, 生成统一的API文档
使用了@EnableSwagger2注解的Spring Boot应用都会在/v2/api-docs路径下, 生成API文档。 不过, 为了方便, 我们希望这些文档都在唯一的地方, 即在API gateway上。 为了达到这个效果, 我们需要在gateway-service模块里实现一个Bean, 它实现了SwaggerResourcesProvider接口。 这个Bean负责定义Swagger资源的存储位置列表。 下面是SwaggerResourcesProvider的实现逻辑, 它基于Spring Cloud Gateway配置的服务发现,提供查看功能。
不过, 不幸的是, SpringFox Swagger还不支持Spring WebFlux。 这样, 如果引入SpringFox Swagger后, 系统就启不起来了。 真心希望后面的版本支持下WebFlux, 不过, 现在为了使用内置的Swagger2, 我们暂时使用Spring Cloud Netflix Zuul实现Gateway。
本文实例中, 又新建了一个proxy-service模块, 作为Spring Cloud Gateway的替代。 下面是SwaggerResourcesProvider实现类,这里使用zuulProperties来动态加载路由规则定义.
@Configuration
public class ProxyApi {
 @Autowired
 ZuulProperties properties;
 @Primary
 @Bean
 public SwaggerResourcesProvider swaggerResourcesProvider() {
  return () -> {
   List resources = new ArrayList();
   properties.getRoutes().values().stream()
   .forEach(route -> resources.add(createResource(route.getServiceId(), route.getId(), "2.0")));
   return resources;
  };
 }
 private SwaggerResource createResource(String name, String location, String version) {
  SwaggerResource swaggerResource = new SwaggerResource();
  swaggerResource.setName(name);
  swaggerResource.setLocation("/" + location + "/v2/api-docs");
  swaggerResource.setSwaggerVersion(version);
  return swaggerResource;
 }
}
下面是Swagger界面, 可以通过http://localhost:8060/swagger-ui.html地址查看.
步骤7. 运行整个应用系统
借着下面的系统关系图, 我们看下整个业务系统的架构。 我们从organization-service开始。启动后, organization-service连接localhost:8088地址上的config-service(对应下图中的步骤1) .基于远程配置项中的设置内容,organization-service把自己注册到Eureka中(对应下图中的步骤2)。 在organization-service通过Gateway(地址是localhost:8060)也调用时(对应下图中的步骤3), 请求会基于发现服务中数据(entries), 被forward到organization-service集群的一个实例上(对应下图中的步骤4)。 接下来organization-service从Eureka中查找到department-service的地址后(对应下图中的步骤5), 调用department-service集群中一个实例(对应下图中的步骤6)。最后, department-service调用employee-service集群中的实例。 打到employee-service集群上的请求通过Ribbon来解决负载均衡问题(对应下图中的步骤7)。

我们观察下http://localhost:8061地址对应的Eureka的Dashboard。 可以看到有四个微服务实例:organization-service和department-service各一个,employee-service有两个实例。

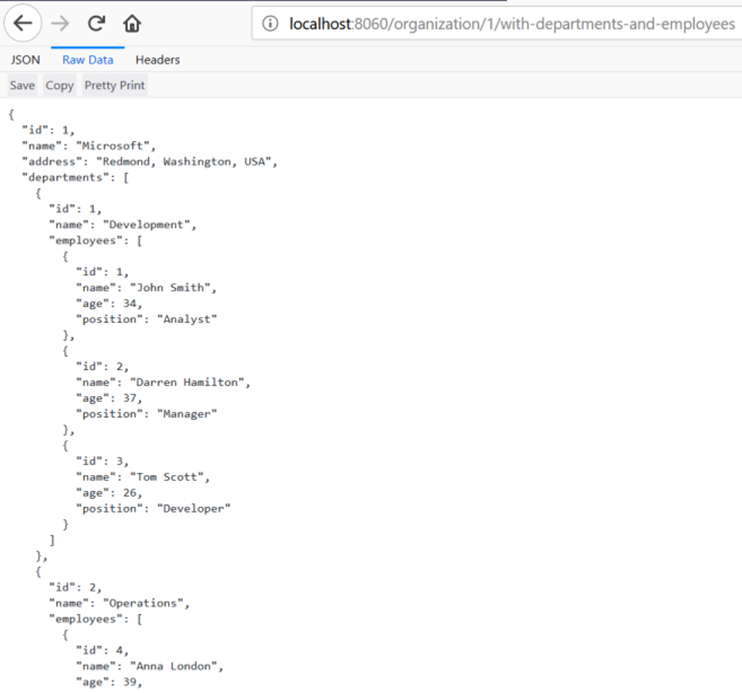
现在通过下面的URL
http://localhost:8060/organization/1/with-departments-and-employees, 我们看到:
步骤8: 使用Spring Cloud和Sleuth关联多个独立应用的日志内容
使用Spring Cloud和Sleuth关联多个独立应用的日志内容, 很是方便。 在实际操作中, 我们只需要在每一个微服务业务和Gateway里添加下spring-cloud-starter-sleuth, 就OK了。 Maven的依赖如下:
<dependency>
 <groupId>org.springframework.cloud</groupId>
  <artifactId>spring-cloud-starter-sleuth</artifactId>
</dependency>

为了简洁,我们调整下log的默认格式, 调整成%d{yyyy-MM-dd HH ss} ${LOG_LEVEL_PATTERN:-%5p} %m%n。下面是三个微服务应用生成的日志。在Spring Cloud Stream生成的日志内容的[]里有四部分, 其中最重要的是第二个Entry, 它表示traceId, 这个值在HTTP请求进入系统里生成。
本文原始博客地址是使用Spring Boot 2.0, Eureka和Spring Cloud快速搭建Spring微服务, 转载请标明。

sluk3r
关注|
发布 3 |
评论 0 |
热门文章
- 1. Spring Cloud Gateway转发Spring WebSocket
- 2. 使用Spring Boot 2.0, Eureka和Spring Cloud快速搭建Spring微服务
- 3. Spring Cloud Gateway揭秘之处理请求流程
- 4. 关于Spring Cloud中国社区
- 5. Spring Cloud版本控制和灰度发布
- 6. Eureka性能测试
- 7. Spring Cloud微服务框架主要子项目和RPC框架的对比
- 8. Spring Cloud实战小技巧(解决feign GET传pojo、继承接口方法参数注解等问题)
- 9. Spring Cloud Gateway入门案例
- 10. spring cloud启动报错,这个咋回事?